

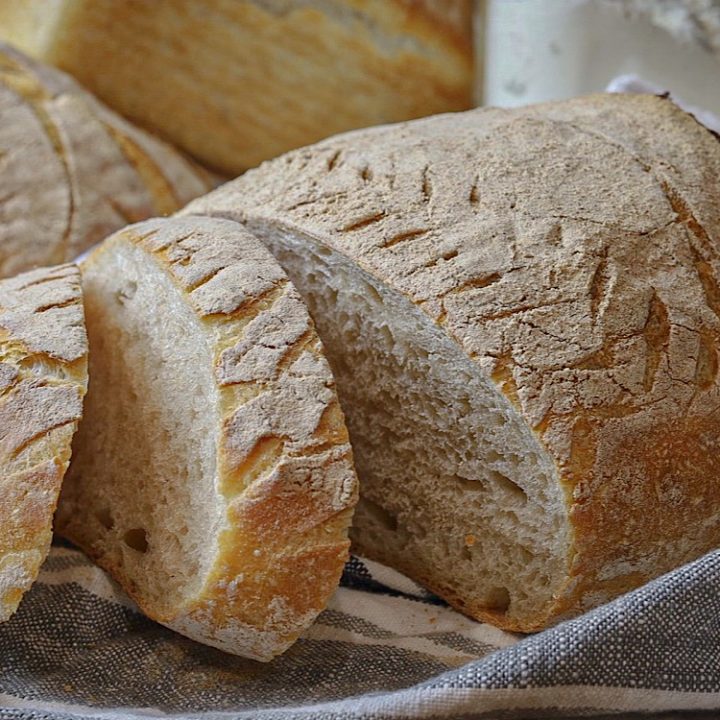
This is The Best Sourdough Bread. From its soft, airy texture and crispy, golden crust to its delicious, authentic and genuine sour flavor. This bread will have you addicted from the very first bite.
If you follow me on social media you’ve heard me say that it took me two years to finally make a successful sourdough loaf. Over and over again I was left discouraged with another solid brick of what was supposed to be bread. But after many painful failures and promising myself to never give up, I finally made a successful loaf!
Honestly, as embarrassing as that sounds, I am thankful for the three million trial loafs it took me to get it right. Maybe a slight exaggeration 😉 but it was the trial and error that helped get me here. And I want to encourage you not to give up either, to use your failed attempts as learning experiences.

Once I learned the importance of precision measurements and figured out the proper timing between feeding, folding and fermenting, my sourdough world was opened wide. This recipe is actually similar to my very first successful loaf and as I also learned about hydration, I was able to tweak this recipe to perfection. I’m excited to finally share this delicious loaf with you!
I will say, this recipe is a bit different than my Simple Artisan Sourdough Bread and my Simple No Knead Sourdough Bread. I shared my simpler recipes first so that those who were new to sourdough could get their feet wet. But now that you have mastered those it is time to try another method.
Don’t have a Sourdough Starter yet?
Before we get started you will need a sourdough starter. If you do not have one yet, here is a Day by Day Guide to help you make your own Sourdough Starter. If you’d like to learn more about the benefits of sourdough, check out my “Why Sourdough?“

How is this Sourdough Bread Different than my other recipes?
This sourdough bread has one extra step. Instead of using straight sourdough starter to make your bread dough, you will use your starter to make something called a levain first. Think of levain as conventional yeast. It’s what will make your bread rise.
Here is the crazy part. You only use 25 grams of your sourdough starter to bake the entire loaf of bread. That’s because you add more flour and water to that 25 grams and another 8-12 hour ferment to create the levain.
In a sense, you are creating a stronger starter that you will bake your bread with. Something magical happens with the levain as the extra fermenting takes the sourdough flavor to the next level.
Don’t be intimidated by levain. If you’ve already mastered my other two sourdough loaves, you will master this one no problem.
The only difference is another 8-12 hours added to the bread making process. Which really isn’t a challenge once you master your time schedule. I share mine below.
UPDATE:
If you maintain a small sourdough starter and want to skip the levain all together, go for it! It’s been a few years since I have posted this recipe and I no longer make the levain portion of this recipe because I maintain a small amount of starter which is active enough, equalling the levain portion of this recipe.

Tools to help get started:
- Kitchen Scale
- Large Glass Bowl
- Towel for covering dough in bowl
- Medium bowl or Banneton Baskets to proof
- Parchment paper
- Household razor blade, Bread Lame or sharp knife to score bread before baking
- Dutch oven to bake your bread in
Time Schedule to make The Best Sourdough Bread
- 8:00-10:00pm~ Within these two hours the night before I want to bake my bread, I make the levain. I mix my starter, flour and water together in a bowl. Cover and rest on counter.
- 6:00-8:00am~ The next morning between these hours I start making my bread. By hand I mix my levain, flour and water into a large glass bowl. Cover and rest for one hour. *I recommend setting a timer to alert you.
- 9:00am~ Pinch in salt. Cover and rest for 30 minutes.
- 9:30am~ First stretch and fold: Take your hand and reach under the side of the dough. Gently pull dough upwards and fold over itself. Turn the bowl 1/4 turn and stretch the dough again and fold. Repeat 2 more folds for a total of 4 stretch and folds. Cover and rest dough for 30 minutes.
- 10:00am~ Second stretch and fold. Cover and rest dough for 30 minutes.
- 10:30am~ Third stretch and fold. Cover and rest dough for 30 minutes.
- 11:00am~ Fourth stretch and fold. Cover and rest dough in bowl for 3-4 hours.
- 3:00pm~ Remove dough from bowl and shape into a ball. It’s okay to deflate your dough, it will puff again during its proof. Place on counter seam side down. Gently pull dough towards you on the counter to pinch the seam underneath and create surface tension on the top. Turn and repeat until your ball is tight and round. A tight ball will rise better. Place dough into a flour lined banneton or towel lined large bowl coated well with flour or well greased sandwich loaf pan to proof. Proof for 2-3 hours. *If using banneton or large bowl place dough in seam side UP. If using sandwich loaf pan place dough seam side DOWN.
- 6:00pm~ Preheat oven to 450 degrees. Score the top of your loaf with sharp knife, household razor or Bread Lame. You can cook your bread right in your loaf pan. If using a banneton, turn dough over onto parchment paper and bake on paper in dutch oven. Bake in Cast Iron Dutch Oven for 40 minutes.
- OR you can slow ferment your bread in the fridge for 12-48 hours. This allows for more fermentation and gives more flexibility in timing the baking of your bread.
Don’t own a Cast Iron Dutch Oven to bake in? That’s ok!
If you do not own a dutch oven, you can preheat your oven for 30 minutes with a cookie sheet on the bottom rack. When you add your dough wrapped in parchment paper to the upper rack, pour two cups of water into your cookie sheet. Quickly close the door to capture the steam in the oven. This will help your dough rise and give it the crunchy outer layer we all love.
Try This!
To keep my Sourdough Bread moist and soft much longer (if it even lasts that long) I add 1 Tablespoon Avocado Oil and 1 Tablespoon Raw Honey to the water and starter mixture at the beginning of the bread making process.
This addition keeps my bread nice and soft and prevents it from becoming a little dry as it sits on the counter for a few days. Give this a try and let me know how you like these simple additions.
Struggling to make Sourdough rise in the winter?
Try this Seedling Heat Mat. It’s a 20×10 mat that lays flat on your counter. It plugs into the wall and gives off a very small amount of heat (like really small).
Simply place your dough on this mat to help your dough rise during the cool winter months.
I get asked often how to rise dough in a cold house during the winter. My suggestions are to place your dough in the oven with the light on, or slightly warm your oven a few seconds and then place dough into a warm oven, or add dough on top of your refrigerator where it’s warm OR this using this Seedling Heat Mat. I have had great success with it, and would recommend it to anyone to use when the house gets cold.
Pin for Later:

Let’s make The Best Sourdough Bread!
The Best Sourdough Bread
Ingredients
Levain (or skip this and just use straight active Sourdough starter)
- 25 grams Active Sourdough Starter
- 60 grams Unbleached Flour (I always recommend Organic)
- 60 grams Filtered water
Sourdough Bread
- 100 grams Levain
- 265 grams Filtered Water
- 400 grams Flour
- 10 grams Unrefined Salt
Instructions
- To make the levain, add 25g starter, 60g flour and 60g water to a medium size bowl. Mix together until well incorporated. Cover and rest for 8-12 hours.
- Add 100g of levain to a large glass bowl. Add 265g water to the levain. Using your fingers, whisk levain into water until it's evenly distributed. It will become a cloudy water. Then add 400g flour. Mix all together by hand. It will be very sticky. Cover and rest in warm area for 1 hour.
- Sprinkle 10 grams of salt over the dough. With your fingers, pinch in the salt. No need to mix here, just pinch it in. Cover and rest for 30 minutes.
- First stretch and fold: Take your hand and reach under the side of the dough. Gently pull dough upwards and fold over itself. Turn the bowl 1/4 turn and stretch the dough again and fold. Repeat 2 more folds for a total of 4 stretch and folds. Cover and rest dough for 30 minutes. I recommend setting a timer to alert you.
- Second stretch and fold: same instructions as step 4. Complete 4 folds. Cover and rest for 30 minutes. Don't forget to reset the timer.
- Third stretch and fold. Complete 4 folds. Cover and rest for 30 minutes. The gluten is starting to develop and you should start noticing that the dough is easier to work with.
- Fourth and final stretch and fold. Complete 4 folds. Cover and rest in the bowl in warm area for 3-4 hours.
- Remove dough and shape into a tight ball. Place on counter seam side down. Gently pull dough towards you on the counter to pinch the seam underneath and create surface tension on the top. Turn and repeat until your ball is tight and round. A tight ball will rise better.
- Line a bowl or banneton with a tea towel or cheese cloth and sprinkle slightly with four. Scoop up your ball and place in the bowl seam side UP. Proof for 2-3 hours to let it rise. *If baking in greased loaf pan place dough in seam side DOWN.
- Option 1: Preheat Cast Iron Dutch Oven for 30-45 minutes at 450 degrees. After proofing, gently flip bread over onto parchment paper. Dust the top with flour. Score loaf with a razor. Pick up corners of parchment paper and transfer to dutch oven. Bake for 30 minutes at 450 degrees F. Remove lid and cook another 5-10 minutes depending on how well done you prefer your crust.
- Option 2: After proofing, cover your dough with plastic wrap and place in refrigerator for 12-24 hours. This slow fermentation will break down the flour further for those who may be more gluten sensitive. Preheat Cast Iron Dutch oven for 30-45 minutes at 450 degrees. Place parchment paper over your dough and gently flip it over onto the paper. Dust the top with flour. Score loaf with a razor. Immediately transfer to dutch oven in the parchment paper and bake for 40 minutes. Remove lid and cook another 5-10 minutes depending on how well done you prefer your crust.
Notes
If you don't own a dutch oven, you can preheat your oven for 30 minutes with a cookie sheet on the bottom rack. When you add your dough wrapped in parchment paper to the upper rack, pour two cups of water into your cookie sheet. Quickly close the door to capture the steam in the oven. This will help your dough rise and give it the crunchy outer layer we all love.
When adding flavors, fold them in during the first stretch and fold to fully incorporate seasonings throughout dough.
To make a bread loaf for sandwiches, bake dough right in a 1lb loaf pan. If your dutch oven is big enough, add loaf pan straight to dutch oven to bake in.
Links:
*This post contains affiliate links that I make a small commission on but it is at no additional cost to you.
Seedling Heat Mat (to rest dough on in winter)
 Skip to Recipe
Love this recipe easy and delicious
Thank you! I make this several times a week too, it’s our favorite!
Trying to perfect how to do my 1st starter and sour dough bread
Hello!
What are the changes you do for more of a hydration loaf?
Thank you!!
Increase the water amount. I like to keep it at a 70% hydration. So I increase the water to 280g.
I tried this tweak to the recipe and it turned out so good!!
Thank you!!
Yay, so glad!
For the cold ferment option, do you need to let the dough come back to room temp before baking or can you pop it straight from the fridge to the dutch oven?
Straight from the fridge. Allow 10-15 minutes more cook time. Just watch it though to make sure it doesn’t get too brown, as every oven is different
So I follow this recipe to a T Everytime, but I usually make it without a Dutch oven. I finally got one today and used it and my bread didn’t really get as “puffy” or big as it usually does. Also, my dough has literally never “risen” even after 24 hours of cold proofing. It always just kind of widens some without rise, and only rises once in the oven.
Do I really bake it at 450 for 40 min.
I used a partial mix of dark rye flour and all-purpose bread flour in my sourdough starter. Should I use a mixture of the two flours for the bread? If so, what should the ratio be? Thanks so much – I am looking forward to trying this recipe this weekend!
I’m not familiar with using rye flour. But I wouldn’t use a lot of it for this recipe. If I had to make an educated guess, I would suggest less than 100 grams of rye flour and the rest your all purpose flour for this recipe. Would love to know how you make it and how it turns out for you!
Hi! New to the sourdough journey and so excited! When you say we can skip the levain step, does that mean I need to use 100g of active starter? I started mine 4 days ago using all-purpose unbleached flour. I discard and leave 75 g of starter and feed 100g flour and 115g water. Is this a good maintenance ratio to still make your recipe, or should I start over?
Thank you!!
I recommend using less water than flour when you’re feeding your starter. The water is heavy and will weigh down your starter. You want to keep the starter thick so as it ferments it gets airy and bubbly. But yes, you can skip the levain and use 100g active starter instead.
Is there anything you would recommend I try in order to keep the bottom of the loaf from getting so hard after I’m finished baking